Mastering Mpx5700dp with Arduino
The integration of Mpx5700dp sensors with Arduino boards enables comprehensive pressure sensor applications in various fields. This article delves into the specifics of using Mpx5700dp with Arduino, offering technical insights, step-by-step guides, and addressing common queries. Pressure sensors are critical in engineering and research, measuring gas or liquid pressure to ensure system accuracy and safety.
Introduction to Mpx5700dp and Arduino
The combination of the Mpx5700dp pressure sensor and Arduino microcontroller platforms creates a powerful tool for multiple applications, including automation, weather monitoring, and laboratory experiments. This high-precision digital pressure sensor is capable of measuring pressures from 0 to 700 kPa, and when paired with the user-friendly and flexible Arduino platform, it unlocks numerous possibilities for hobbyists and professionals alike. The ease of use of the Arduino platform, combined with the precise measurement capabilities of the Mpx5700dp, offers users a seamless integration that can lead to innovative projects across various sectors.
The Importance of Pressure Sensing
In the realm of engineering and technology, pressure sensing is crucial. It monitors and controls a range of systems, from hydraulic machinery to environmental systems. The Mpx5700dp is prized for its accuracy and reliability, making it a suitable fit for precise applications where pressure measurement is critical. By integrating this sensor with Arduino, users gain the ability to implement customized solutions that fit their unique needs. For example, monitoring the pressure in pneumatic systems can help prevent equipment failures, ensuring smooth operations in manufacturing processes. Similarly, in environmental applications, accurate pressure readings can correlate with weather predictions or climate research, underscoring the vital role pressure sensors play in modern technology.
Technical Insights: Understanding the Mpx5700dp
The Mpx5700dp sensor is a versatile device known for its dual-port design, which allows it to gauge the differential pressure. Its robust construction ensures stability even in demanding environments. These attributes make it an attractive choice for projects requiring reliable pressure data. The sensor's construction features a piezoresistive silicon element that provides a linear output, allowing for straightforward interfacing with microcontrollers. Its operational temperature range and wide supply voltage can accommodate different settings, making it suitable for both indoor and outdoor applications. Additionally, the Mpx5700dp is designed to minimize temperature drift, enhancing its accuracy and making it effective for long-term use without significant recalibration.
Specifications of the Mpx5700dp
Understanding the specifications of the Mpx5700dp is essential for effectively integrating it into your projects. Below are some key specifications:
- Pressure Range: 0 to 700 kPa
- Output Type: Analog voltage output
- Full Scale Output Voltage: Proportional to applied pressure
- Operating Temperature Range: -40°C to +125°C
- Supply Voltage: 10 V to 30 V
- Accuracy: ±1.5% of full-scale output
Implementing the Mpx5700dp with Arduino
Building a project with the Mpx5700dp and Arduino involves several steps, beginning with connecting the hardware, followed by programming the sensor. The following guide outlines the basic procedure to help you get started:
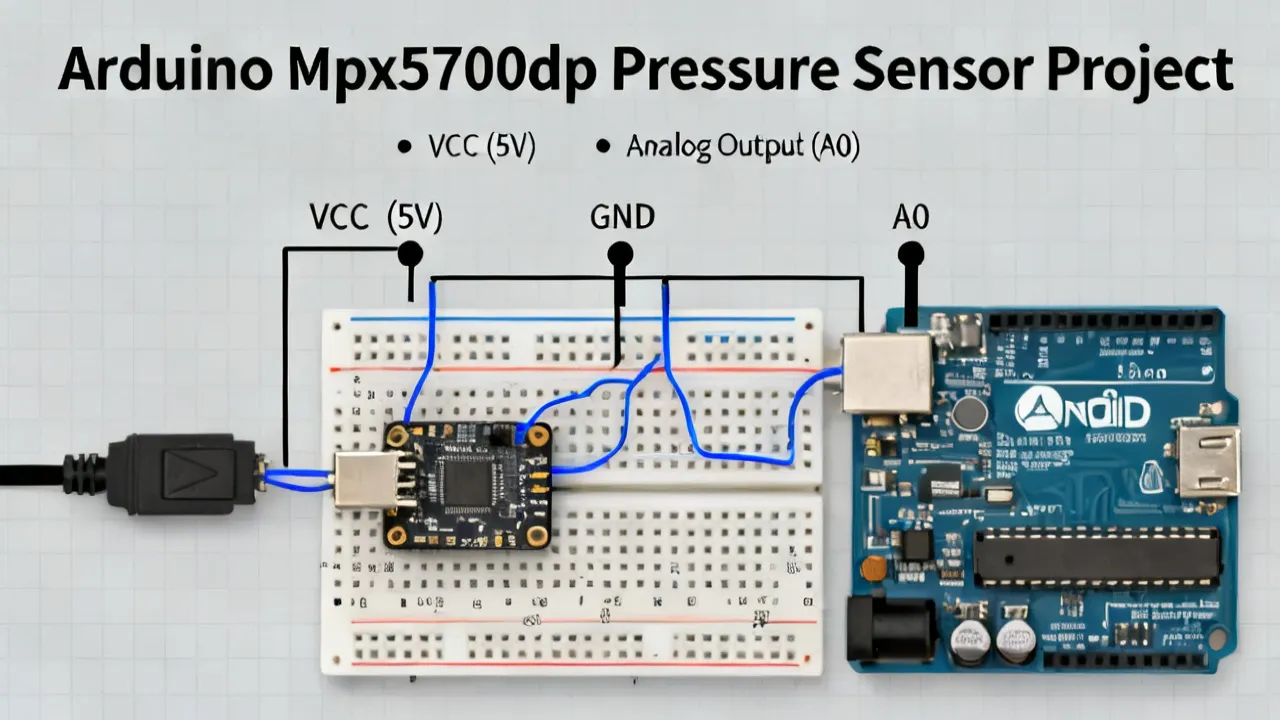
- Connect the Mpx5700dp sensor to the Arduino's Analog pins, ensuring correct pin alignment and secure connections. Commonly, the output pin from the sensor would go to an analog pin on the Arduino (like A0), while power and ground pins are connected accordingly.
- Write a program using the Arduino IDE to receive and interpret data from the sensor. This program will typically include reading the analog value, converting it to a pressure reading, and then displaying that value on a serial monitor or other output devices.
- Calibrate the sensor to ensure accurate readings by comparing its data with known pressure values, making necessary adjustments in the code to correct any discrepancies.
- Test the assembly in a real-world scenario to ensure reliability and precision of pressure readings. Conduct experiments under various pressures to confirm the sensor's output aligns with expected values.
Step-by-Step Guide: Implementing the Sensor in a Project
| Steps | Description |
|---|---|
| 1. Assemble the Circuit | Connect the Mpx5700dp to an Arduino board using appropriate jumper wires. Pay careful attention to pin assignments. Ensure that the sensor is powered correctly to avoid damage. A typical connection involves connecting Vcc to the 5V pin on the Arduino, Ground to GND, and the output pin to one of the analog inputs like A0. |
| 2. Develop the Code | Using Arduino IDE, write a script to read data from the sensor and upload it to the Arduino board. Begin with initializing the `analogRead()` function to gather data from the sensor's output pin. Process the analog value to convert it into an actual pressure reading using calibration constants. The basic structure of the code might look like this: |
void setup() { Serial.begin(9600); } |
void loop() { int sensorValue = analogRead(A0); float pressure = sensorValue * (5.0 / 1023.0) * 700; Serial.println(pressure); delay(1000); } |
| 3. Calibrate | Ensure that the sensor is properly calibrated to deliver accurate pressure readings. This involves comparing the sensor's outputs against known reference pressures. Adjust the conversion constants in your code if necessary to fine-tune the accuracy of the readings. |
| 4. Test and Iterate | Run the project in different conditions to verify the sensor's accuracy, making adjustments as necessary. Document the readings and establish a calibration curve if required for critical applications. Consider variations in temperature and humidity, as they can also affect readings. |
Gallery of Applications
Projects utilizing the Mpx5700dp and Arduino span various fields. From constructing DIY weather stations to developing laboratory pressure systems, the possibilities are endless. Each application showcases the flexibility and precision the Mpx5700dp sensor coupled with Arduino brings to modern engineering challenges. Below are some illustrative applications that underline the sensor's versatility:
- DIY Weather Station: Measure atmospheric pressure to predict weather changes. The readings can be processed and displayed, providing real-time weather insights.
- Aquarium Monitoring System: Keep track of water pressure in pump systems to ensure optimal aquarium conditions, ensuring the health of aquatic life.
- Laboratory Experiments: Use the sensor to monitor pressure changes in chemical reactions, providing crucial data for various scientific experiments.
- Pneumatics Projects: Integrate the sensor into pneumatic systems to maintain pressure levels efficiently, enhancing the reliability of automated machinery.
- Farm Irrigation Systems: Monitor water pressure in irrigation systems, ensuring consistent water delivery throughout farms, thus promoting better crop yields.
FAQs
- Can the Mpx5700dp be used with microcontrollers other than Arduino?
Yes, the Mpx5700dp can be interfaced with various microcontrollers, provided they support analog-to-digital conversion capabilities. Examples include Raspberry Pi, ESP8266, and other similar platforms that can read analog voltage signals. - What are the calibration requirements for the Mpx5700dp?
Calibration involves setting the sensor against a known pressure reference, which should be performed periodically to ensure accurate readings. Calibration can also involve making compensations in the software to address any device-specific variances observed during testing. - What is the typical application of the Mpx5700dp sensor?
It is widely used in industrial and scientific applications, including medical equipment, environmental monitoring systems, and industrial controls. Additionally, its versatility allows use in educational settings for teaching electronics and engineering fundamentals. - Can the Mpx5700dp measure negative pressure?
The Mpx5700dp is primarily designed for positive pressure measurements (0 to 700 kPa). For negative pressures, a different sensor capable of measuring vacuum conditions might be more appropriate. - How does temperature affect the Mpx5700dp readings?
Temperature can cause drift in the sensor's output. Always account for possible environmental changes by calibrating the sensor under the same conditions in which it will operate.
Conclusion
The Mpx5700dp sensor, when paired with the versatility of the Arduino platform, provides a robust solution for precision pressure measurement. Whether you are a hobbyist or a professional, mastering this integration opens a pathway to innovative and practical applications across diverse disciplines. Through careful calibration and diligent programming, you can achieve a high level of customization tailored to specific project requirements. Explore the endless possibilities this combination offers, as it not only enhances understanding of both pressure sensing technology and microcontroller programming but also fosters creativity in designing unique solutions to real-world challenges. Embrace the journey of experimentation and discovery with the Mpx5700dp and Arduino platform, and push the boundaries of what is possible in your projects.
Advanced Integration Ideas
Once you become familiar with the Mpx5700dp and basic Arduino programming, there are numerous advanced integration ideas you might explore. Here are a few suggestions to inspire your next project:
- Build a Data Logger: Pair the Mpx5700dp with an SD card module to log pressure readings over time. This can be immense for environmental studies where historical data is crucial. Using the Arduino library for SD cards, you can create a data log that records pressure changes along with time stamps.
- Wireless Pressure Monitoring: Utilizing ESP8266 or ESP32 boards with the Mpx5700dp allows you to wirelessly transmit pressure data to the cloud or a local server. This can be integrated with mobile applications, enabling remote monitoring of pressure-related data, which is invaluable in many IoT applications.
- Automated Pressure Control System: Combine the Mpx5700dp with relay modules to create an automated pressure control system. By monitoring pressure levels, you can control valves or compressors in real-time, optimizing energy usage and maintaining desired pressure levels in any system.
- Visual Data Display: Enhance your project with an LCD display to show real-time pressure values. Combining the Mpx5700dp with a display module such as OLED or TFT could provide users with instant visual feedback, making the system more user-friendly.
- Integrate with Other Sensors: Consider using the Mpx5700dp alongside other sensors like temperature or humidity sensors to create a comprehensive environmental monitoring station. This integration can provide contextual data to pressure readings, enriching your applications.
Resources for Further Learning
To deepen your understanding of the Mpx5700dp sensor and Arduino, numerous resources are available to assist you:
- Arduino Documentation: Visit the [Arduino website](https://www.arduino.cc) for extensive manuals, tutorials, and community projects which can provide useful insights and inspiration.
- YouTube Tutorials: Several creators upload step-by-step video guides detailing projects and integrations specifically with the Mpx5700dp, offering visual learners a chance to see the process in action.
- Online Courses and Forums: Websites like Coursera, Udemy, and Arduino project hubs provide courses focused on sensor integrations that can bolster your skills further.
- Books on Arduino and Sensors: Consider reading practical books which cover Arduino programming concepts extensively, such as "Arduino Cookbook" by Michael Margolis, which offers in-depth explanations and project ideas.
Final Thoughts
The journey into integrating the Mpx5700dp sensor with an Arduino will undoubtedly encourage innovation and creativity in various applications. As technology continues to advance, the capacity to understand and manipulate pressure sensing opens up vast possibilities across different industries. Whether aiming for a hobby project or a professional prototype, the knowledge gained through experimenting with the Mpx5700dp will serve as a valuable asset as you navigate the seas of modern electronics.
-
1

Explore the Tranquil Bliss of Idyllic Rural Retreats
-
2
Unlock the Full Potential of Your RAM 1500: Master the Art of Efficient Towing!
-
3
Leveraging High-Interest CDs for Optimized Investment Returns
-
4
How to Take Advantage of Debt Consolidation Loans: Key Strategies
-
5
Understanding Debt Consolidation Loans: Weighing Advantages and Disadvantages